The focus of this dev log will be revisiting the character controller and post processing before the final build.
New Character Movement Script
The character controller used in the first bock out build only allowed the player to walk around the environment, however for the current build of the environment it was decided that the character controller should be able to do more.
This new character controller had more functionality and settings than the old one, as well as the ability to add, in the future, a settings menu where individual settings could be changed by the player. These settings were Walking Speed, Running Speed, Jump speed, Gravity, Player Camera, Look Speed, and Look X Limit. While there is no jump in the environment currently to avoid issues the gravity was set to 20 and the jump speed was set to 0.
The way this script worked was by having separate objects that dealt with separate functions.
        Vector3 forward = transform.TransformDirection(Vector3.forward);
        Vector3 right = transform.TransformDirection(Vector3.right);

        bool isRunning = Input.GetKey(KeyCode.LeftShift);
        float curSpeedX = canMove ? (isRunning ? runningSpeed : walkingSpeed) * Input.GetAxis("Vertical") : 0;
        float curSpeedY = canMove ? (isRunning ? runningSpeed : walkingSpeed) * Input.GetAxis("Horizontal") : 0;
        float movementDirectionY = moveDirection.y;
        moveDirection = (forward * curSpeedX) + (right * curSpeedY);

        characterController.Move(moveDirection * Time.deltaTime);
For the player movement, the first step is to calculate the players forward direction, taking into account the players rotation in world space. The next step is to do the same for the right direction. The third step is to check if the player is pressing the shift key, if the player is pressing the shift key the isRunning bool will be set to true. The next step is to create a float value called curSpeedX representing the current speed on the vertical axis, this is modified based on if the player is running or walking, we multiply that speed by the players movement direction, unless the players movement is disabled then we multiply everything by 0. This step is repeated for the Y axis, with vertical being swapped for horizontal. The next step stores the players vertical movement so when the player is jumping or affected by gravity the players vertical velocity is maintained. The next step is to calculate the total movement of the player based on the input, this is done by multiplying the forward vector by the curSpeedX and adding the result of multiplying the right vector multiplied by the curSpeedY, this is stored in the moveDirection variable. The final step is utilise the characterController.Move and move the character based on the moveDirection variable multiplied by the Time.deltaTime variable. This all together allows the player character to move.
        rotationX += -Input.GetAxis("Mouse Y") * lookSpeed;
        rotationX = Mathf.Clamp(rotationX, -lookXLimit, lookXLimit);
        playerCamera.transform.localRotation = Quaternion.Euler(rotationX, 0, 0);
        transform.rotation *= Quaternion.Euler(0, Input.GetAxis("Mouse X") * lookSpeed, 0);
The camera movement was done utilising the variable rotation X. This variable is first updated by adding the vertical mouse movement multiplied by the look speed value. The next step is to restrict the amount the player is allowed to look vertically, this is done with a Mathf.Clamp function that limits the rotation x to the lookXlimit variable in both the positive and negative directions. The next step is to set the rotation of the camera in the vertical plane, this is done with a Quanternion.Euler function, where the rotation x value is set to the cameras X rotation value. The final step is to setup the cameras horizontal controls, this is done with calculating the mouse’s movement on the horizontal axis, then multiplying this by the look speed, before applying this value to the cameras Y rotation value. This all together allows the player to control the camera.
This script was then added to a prefab containing a capsule, and a camera, this camera was set to have a horizontal field of view of 100, with settings edited to fit the visuals I had in mind, these being the environment being seen through a physical camera rather than a characters eyes.
Camera and Post Processing
The camera additionally had a few extra settings enabled that allowed for it to seem as if the environment was being viewed through a physical camera.
The first setting was the Physical camera setting, this allowed for me to directly control the cameras sensor, ISO, Shutter Speed, Focal length, aperture, and aperture shape. With my background in photography I understood how to effectively utilise these settings, the settings I fine tuned the most to get how I wanted mostly fell under the lens settings. This is as I wanted the output to closely resemble a the view though a lens I have used in the past, a Nikon AFS 8-15mm f/3.5-4.5. I chose to try and mirror this lens as I felt it helped create the feeling of a horror game environment more than other lenses, with a wide view, where the edges were slightly distorted, and objects appearing up-close being blurred. This however wasn’t fully the work of the camera settings.
The postprocessing settings allowed for the distortion and blurring of the image, this was through the use of various effects including, lens distortion, film grain, chromatic aberration, and depth of field. The depth of field setting linked directly back to the camera settings and based on those set the depth of field. The use of the lens distortion was to create a slight fisheye effect where parts of the towards the edge of the image would appear bent, the use of film grain was to create a higher sense of a camera being used to capture the environment. The use of chromatic aberration is intended to distort the out of focus areas slightly by separating the colours, this is due to different colours being affected by the glass in the lenses differently due to their differing wavelengths. These post processing effects are the only ones that are intended to affect the camera.


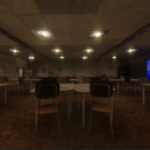
There are other postprocessing settings included in the environment as well, these mostly relating to the lighting, fog, bloom ,raytracing, ambient occlusion, shadows, and subsurface scattering. These settings were mostly added before this point as it was required that the raytracing, subsurface scattering, and shadow settings were added earlier to properly visualise textures, reflections, and how assets interacted with the scenes lighting. The fog, and lighting edits however were added after, allowing for the darkening of the scene and a more eerie sense to be felt when looking at the environment. Bellow is a comparison with all the post processing settings turned off vs all enabled.

As we can see, without any of the post processing effects enabled the scene is too brightly lit, without any shadows, and the lack of ambient occlusion on the walls leads to some interesting results with areas being darkened and brightened in ways that are not realistic. The lack of screen space or raytraced reflections leads to metallic objects seeming flat, and surfaces that would normally reflect some light not doing so. This comparison shows how I have effectively utilised post processing to improve my final product.